Tuesday, 12 November 2013

UV particles via SOuP

Here is a small SOuP technique for producing a plane of particles with a UV gradient on their RGB.

First you need a plane, then emit some particles from that plane. Make sure that the particles have the rgbPP attribute available as we will need to put an expression on it.

Create a SOuP TextureToArray node
Create a SOuP rgbaToColorAndAlpha node
Create two ramp texture nodes - ramp1 is black to red along U, ramp two is black to green along V

Connect the following:

ramp2.outColor -->  ramp1.colorOffset
ramp1.outColor --> textureToArray1.inColor
polyPlaneShape.worldMesh[0] --> nParticleShape.inputGeometry
polyPlaneShape.worldMesh[0] --> textureToArray1.inGeometry
textureToArray1.outRgbaPP --> rgbToColorAndAlpha1.inRgbaPP 

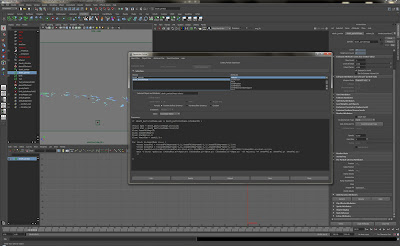
Also connect the emitting plane's transform node to the particle's transform node as shown in the node graph.


Now set the rgbPP using the creation expression:

rgbPP=rgbaToColorAndAlpha1.outRgbPP

Rewind and step forward one frame so that the particles are emitted. Then set their initial state and disconnect the emitter and the connection between polyPlaneShape.worldMesh[0] --> nParticleShape.inputGeometry


The particles will now be dynamic again.


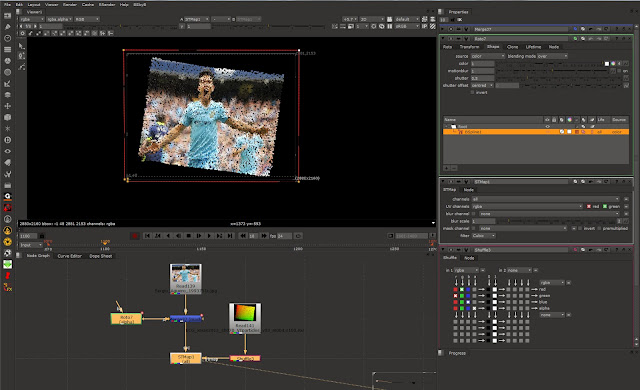
In Nuke, plug in your rendered particles into the STMap node as shown in the image below


Monday, 11 November 2013

Ticker-Tape Tumble

Here is an expression I used to simulate the tumbling motion of ticker-tape.
The ticker tape need to tumble fast around its long axis, in my case the x-axis.


//which direction to tumble?userScalar1PP=rand(1);if(userScalar1PP<0.5){tumble_dirPP=1;}else {tumble_dirPP=-1;}

tumble_speedPP=rand(30,60);

rotStartPP=sphrand(360);rotIncrPP=<<(tumble_speedPP * tumble_dirPP),rand(-2,2),rand(-10,10)>>;

rotationPP=rotStartPP;

sizePP=rand(0.25,0.35);

indexPP=rand(3);

lifespanPP=99;

Friday, 13 September 2013

GPU renderers

I will be testing some particle renderers in the next few days - Arnold, Fury and Krakatoa.


This first test is Fury

20 million nParticles
motion blur switched ON
4 x multisampling

13.26 seconds (dual Xeon E5 - 32 cores, 48GB RAM, Nvidia Quadro 4000)

I'm showing the alpha channel only because I currently just have the demo version of Fury and the watermark is distracting in the colour channel.


The next test is Krakatoa

motion blur OFF, render time 11 seconds

It's slightly trickier to get started with Krakatoa, but I think the results look amazing. Again, this is a lot of particles (14 million)


Here is my setup for Arnold, but I cannot seem to get the opacity to work properly.


More details as soon as I can get some help making this work.


Monday, 9 September 2013

nCloth instances

I have been working on a confetti shot and wanted to use nCloth. I decided to use a particle emitter and to instance the nCloth object onto the particles - but how? If I were to simply assign the nCloth object to the instance, then each instance would be identical. I wanted to have a different starting point in the nCloth cache for each instance. Unfortunately Maya's instancer doesn't support this kind of connection. I tried to use an userScalarPP attribute along with a particle sampler to access the cacheStart attribute on the nCloth cache, but that didn't work.

Here's how I did it:

First cache the nCloth object

Export the nCloth as a sequence of OBJs. I used a python script called objsExporter_v2 from Christos Parliaros

Re-import the OBJ sequence using Dave Girard's objSequenceImporter

Use the imported OBJs to create an instancer with cycling set to On

On the particle object I setup a per-particle attribute; cyclePP and used this to select the correct OBJ in the sequence. For example, if there are 30 OBJs in your sequence, in the creation expression:

cyclePP=0;

and in the Runtime before dynamics:

cyclePP=(cyclePP+1) % 30;

so the nCloth object will loop through the cache and start from the beginning at the end of the loop.

Maya Strands*

*OK, not exactly the same as Softimage ICE strands (which are great, by the way), but here is a way to get a very basic approximation.

I am basically taking Sigillarium's particle expression for making a uniform trail of particles and adding a line to take the seed particle's colour attribute and passing it to the emit command. This way, the trails have the same colour as the emitter particle, which is very handy if you are emitting from a surface and inheriting particle colour from that surface.

Here is the expression:

//runtime before dynamics
seed_particleShape.beforePosition = seed_particleShape.position;


//runtime after dynamics
string $trail_pt = "smoke_nParticle";
float $separ = seed_particleShape.separation;
vector $lastPos = seed_particleShape.beforePosition;
vector $pos = seed_particleShape.position;
vector $move = <<(($pos.x)-($lastPos.x)), (($pos.y)-($lastPos.y)), (($pos.z)-($lastPos.z))>>;

//get colour info
vector $rgb=seed_particleShape.rgbPP;
float $r=$rgb.r;
float $g=$rgb.g;
float $b=$rgb.b;

//get number of particles to emit per frame
int $num = ceil( mag( $move ) / $separ );

//loop !
if( $num != 0 ) {
vector $step = $move / $num;
for( $i = 1; $i <= $num; $i++ ) {
vector $newPos = $lastPos + $step*$i;
float $life = time - (1.0/25/$num * ($num-$i));
emit -o $trail_pt -pos ($newPos.x) ($newPos.y) ($newPos.z) -at rgbPP -vv ($r) ($g) ($b) -at "birthTime" -fv $life;
}
}


There are a couple of things to note:

The seed particle shape node has an extra attribute added - separation. This is a float value that determines the distance between each particle in the trail. The number you use depends on the scale of the scene and velocity of the seed particle. It's handy to have this variable on the shape node rather than in the expression.

There is a per-particle vector attribute called beforePosition, which stores a particle's position from the previous frame. This attribute needs to be created using the Add Attribute dialogue:


Also, note the variable $trail_pt in the expression. This is just the name of the trail particle object. Create this object before running the expression either by a 'particle' or 'nParticle' MEL command or by creating an emitter via the menus and deleting the emitter and leaving the particle object behind. Set the $trail_pt variable to the name of your trail particle object.


So, you can hopefully see that I have an image on a plane from which I am emitting some particles which are taking the colour from the plane. Those particles are then emitting more particles in a trail and inheriting the colour from the first particles.

Thanks to Sigillarium for the excellent expression. Please check the Sigillarium blog as it is outstanding and very clearly explains some difficult concepts.

Motion Vectors for hardware particles

I am trying to write an expression which will mimic the mv2DToxik motion vectors, but for hardware particles. Therefore removing the need to instance some geo to get the motion vectors to render.

I have not got very far before I came across some vector maths...


Here is the setup which works for a camera pointing exactly down the z-axis.


Here is the render loaded into Nuke. Notice the RGB values.


I now need to find a way to convert World Velocity to Screen Space Velocity.
In a MEL expression. Hmmm, time to ask the Forum

After some great advice from Zoharl, I grabbed some code which uses the camera's worldInverseMatrix to transform the velocity vector.

Here is the expression:

//multiplier
float $mult=0.5;

//get the particle's World Space velocity
vector $vel=particleShape1.worldVelocity;
float $xVel=$vel.x;
float $yVel=$vel.y;
float $zVel=$vel.z;

// create particle's velocity matrix which is in World Space
matrix $WSvel[1][4]=<<$xVel,$yVel,$zVel,1>>;

// get the camera's World Inverse Matrix
float $v[]=`getAttr camera1.worldInverseMatrix`;
matrix $camWIM[4][4]=<< $v[ 0], $v[ 1], $v[ 2], $v[ 3]; $v[ 4], $v[ 5], $v[ 6], $v[ 7]; $v[ 8], $v[ 9], $v[10], $v[11]; $v[12], $v[13], $v[14], $v[15] >>;

//multiply particle's velocity matrix by the camera's World Inverse Matrix to get the velocity in Screen Space
matrix $SSvel[1][4]=$WSvel * $camWIM;

vector $result = <<$SSvel[0][0],$SSvel[0][1],$SSvel[0][2]>>;
float $xResult = $mult * $result.x;
float $yResult = $mult * $result.y;
float $zResult = $mult * $result.z;

//rgbPP
particleShape1.rgbPP=<<$xResult,$yResult,0>>;


So far it seems to be working, but I will try to test it and see if it breaks down.


Thanks to Zoharl on the CGTalk forum and to xyz2.net and 185vfx who came up with the original matrix manipulation code.

Emit particles upon the death of another particle

In Maya it is relatively easy to emit particles when another particle collides with an object, but to emit a particle when another particle dies required a different procedure, and... an expression !
I wanted to use this little trick today so I will show how it is done:

The effect I wanted to create was for a load of small zingy trails roughly following a path. There a many ways to create this, here is how I did it:

1 create a path

2 create a emitter for some particles that will die quickly but randomly and emit particles upon their death. Those emitted particles will themselves emit a trail of streaky particles.

so we have three particle objects: death_particles, birth_particles, trail_particles. The death_particles will die and give birth to the birth_particles, which will then emit the trail_particles. Still with me ? Then let's do it !

3 give death_particle a lifespanPP

4 create a particle object using either the particle MEL command or by using the Create Emitter command from the menus and then deleting the emitter but keeping the particle object. Rename the particle object to 'birth'

5 Now we need to make the runtime expression. here it is, I will explain it afterwards:

//
// emit upon death
//

if (death_particleShape.age >= death_particleShape.lifespanPP) {
vector $pos = death_particleShape.position;
vector $vel = death_particleShape.velocity;
float $randVelMag=10;
float $randPosMag=1;
float $velMult=0.1;
float $emitNum = rand(1,3);
for ($i=0; $i<$emitNum; $i++) {
vector $randVel = <<$randVelMag*rand(-1,1),$randVelMag*rand(-1,1),$randVelMag*rand(-1,1)>>;
vector $randPos = <<$randPosMag*rand(-1,1),$randPosMag*rand(-1,1),$randPosMag*rand(-1,1)>>;
vector $newVel=<<($velMult*(($randVel.x)+($vel.x))),($velMult*(($randVel.y)+($vel.y))),($velMult*(($randVel.z)+($vel.z)))>>;
emit -o birth -position (($randPos.x)+($pos.x)) (($randPos.y)+($pos.y)) (($randPos.z)+($pos.z)) -at velocity -vv ($newVel.x) ($newVel.y) ($newVel.z);
};
};

basically it is an EMIT command with some randomness added to the position and velocity parameters.

$randVelMag is a multiplier for the randomness in the velocity of the birth_particle when it is emitted
$randPosMag is a multiplier for the emitted position of the birth_particle
$velMult is another multiplier of the velocity, just so I can go in and change one parameter and all the velocity vectors are affected.
$emitNum is how many birth_particles are created each time a death_particle dies


I then applied some turbulence fields to the birth_particles to get them to wiggle a bit and tweaked the conserve on them and the trail_particles. Here is a rendered frame.


Rendering a refraction UV pass for water droplets


I've been working on a shot with a swimming pool and some splashes and water droplets. There was no light probe so I needed to replicate the lighting and refraction within the droplets.
I used the UV pass method with Nuke's STmap node- here's how:

1. Once you have your droplets simulated and you are ready to render, assign your particles as Blobby Surface (s/w) type.

2. Create a Blinn shader with 100% transparency, switch on refractions in the raytrace options and assign that shader to your particle object.


3. create a poly plane that fills the frame and is behind the particles (i.e. you can see the particles in front of the place when looking through your camera). rename the plane to UVplane. In the UVplane's render options, set the primary visibility to be off but make sure it is visible in refractions.


4. create a surface shader and assign it to the UVplane

5. create a sampler info node and make the following connections:

samplerInfo.vCoord -> surfaceShader.outColorG

samplerInfo.uCoord -> surfaceShader.outColorR


6. Render.

7. In Nuke, get a STMap node and plug in the background plate into the src pipe and your render into the stmap pipe


You will see a refracted background in your droplets and you can composite this how you like.

In this example, you can see the original plate with the swimming pool and the person in the pool refracted through the water droplets (just...).

SOuP shatter recipe

This is not strictly a particle effect tip, but particles are involved in a way.<br />
<br />
I will simply outline the steps involved in creating a shatter effect using Peter Shipkov's most excellent <a href="http://www.soup-dev.com/">SOuP</a> plugin suite for Maya. I recommend all Maya users to install SOuP and learn how to use it. I am also referring to <a href="http://www.vimeo.com/20823202">Jostein Finnekasa's excellent tutorial on Vimeo</a>.<br />
<br />
The purpose of this post is simply to write down all the steps that have already been outlined by Peter and Jostein, so that I can remember them!<br />
<br />
Here are my notes on how to set up the shatter effect:<br />
<br />
1. Drag any poly object's shape node from the Outliner to the Hypershade<br />
<br />
2. Create a Scatter node from the SOuP shelf<br />
<br />
3. Create a Shatter node from the SOuP shelf<br />
<br />
4. Connect:<br />
<br />
<span class="Apple-style-span">polyShape.worldMesh -&gt; scatterShape.inGeometry<br />polyShape.worldMatrix -&gt; scatterShape.inWorldMesh</span><br />
<br />
5. Connect:<br />
<br />
<span class="Apple-style-span">scatterShape.outPositionPP -&gt; shatter.inPositionPP<br />scatterShape.outGeometry -&gt; shatter.inGeometry</span><br />
<br />
6. Make a copy of the poly object, set its scale to (1,1,1), drag its shape node into the Hypershade<br />
<br />
7. Connect:<br />
<br />
<span class="Apple-style-span">shatter.outGeometry -&gt; polyShape2.inMesh</span><br />
<br />
You should have a network like this one:<br />
<br />
<br />
<br />
<br />
<a href="https://blogger.googleusercontent.com/img/b/R29vZ2xl/AVvXsEja-7ikgEobiqiUwNswjWH-m0h2nvMi6EL27LKNrQpDD5ZWgJyHCC8PzbSzk2GRfE18LX4upgLE1wz5gKXKXk7Ltf5AnhLL-g_ILmi50WF60rYZDWAIguHZONOP8DFUTzT6pAFAFBX8FCNv/s1600/SOuP_01.bmp"><img alt="" border="0" id="BLOGGER_PHOTO_ID_5660322291054215586" src="https://blogger.googleusercontent.com/img/b/R29vZ2xl/AVvXsEja-7ikgEobiqiUwNswjWH-m0h2nvMi6EL27LKNrQpDD5ZWgJyHCC8PzbSzk2GRfE18LX4upgLE1wz5gKXKXk7Ltf5AnhLL-g_ILmi50WF60rYZDWAIguHZONOP8DFUTzT6pAFAFBX8FCNv/s320/SOuP_01.bmp" style="cursor: hand; display: block; height: 176px; margin: 0px auto 10px; text-align: center; width: 320px;" /></a><br /><br />Now, you will notice that my horse is shattered but yours is not, that is because I checked Auto Evaluate on the Shatter node which is disabled by default. This is because the shattering process can take a long time to calculate depending on the number of points generated by the Scatter node. I suggest lowering the Max Number of Points on the Scatter node to 10 before checking the Auto Evaluate on the Shatter node so you can check that everything is connected up and working correctly.<br />
<br />
<br />
So, you have a shattered poly, but there are no dynamics. The method that I have used to add dynamics is to make the shattered geometry a nCloth object. Here are my notes taken from Jostein Finnekasa's <a href="http://www.vimeo.com/20823202">Vimeo tutorial </a>which explains everything very clearly.<br />
<br />
1. Check Auto Evaluate on the Shatter node<br />
<br />
2. Click the Bake Result on the shatter node when you are happy with your shatter results.<br />
<br />
3. Apply a shader to the bakedResult<br />
<br />
4. Create nCloth with the bakedResult selected<br />
<br />
<br />
This will give you a nCloth object to which ou can apply all the usual forces and collisions. The workflow goes on to create dynamic contraints, nComponents and SOuP's Attribute Transfer node with Bounding Boxes to override the constraints. Here are my notes:<br />
<br />
1. Select all vertices of the nCloth object<br />
2. create a Transform nContsraint<br />
3. Making the constraint created a Dynamic Constraint node. Drag this node from the outliner to the Hypershade<br />
4. If you select and graph the bakedResult and the Dynamic Constraint nodes. You should see a graph like this one:<br />
<br />
<br />
<a href="https://blogger.googleusercontent.com/img/b/R29vZ2xl/AVvXsEiwA0vGONe-4GcQdO1VALyLbvfJEKUa25yt0B1oio97TKxMUP96_U8vpheJgsEbBDaqBqPmUut10NigMMW6RW-0cqB2ag2DMomvAgCYePNzut6Kixm4t2Q8zEFo1Yy7VMIl8JjRFco5gdoc/s1600/SOuP_02.bmp"><img alt="" border="0" id="BLOGGER_PHOTO_ID_5660343643447136050" src="https://blogger.googleusercontent.com/img/b/R29vZ2xl/AVvXsEiwA0vGONe-4GcQdO1VALyLbvfJEKUa25yt0B1oio97TKxMUP96_U8vpheJgsEbBDaqBqPmUut10NigMMW6RW-0cqB2ag2DMomvAgCYePNzut6Kixm4t2Q8zEFo1Yy7VMIl8JjRFco5gdoc/s400/SOuP_02.bmp" style="cursor: hand; display: block; height: 220px; margin: 0px auto 10px; text-align: center; width: 400px;" /></a><br />
Here is the method for setting up the Attribute Transfer on the nCloth constraint:<br />
1. Create an Attribute Transfer node<br />
2. Check the Weight box on the Attribute Transfer node<br />
3. In the Attribute Transfer node, create two Bounding Box objects.<br />
4. Set the first Bounding Box to a cube and scale it so that it completely envelopes the poly object.<br />
5. Set the first Bounding Box's Weight Falloff to a flat ramp with value 1<br />
6. Set the second Bounding Box shape to a sphere<br />
7. Set the second Bounding Box's Weight Falloff to a flat ramp with value -1<br />
8. Connect:<br />
<span class="Apple-style-span">bakedResultShape.worldMesh -&gt; attributeTransfer.inGeometry</span><br />
9. Connect:<br />
<span class="Apple-style-span">attributeTransfer.outWeight -&gt; nComponent.strengthPerVertex</span><br />
attributeTransfer.outWeight -&gt; nComponent.glueStrengthPerVertex<br />
<span class="Apple-style-span">attributeTransfer.outWeight -&gt; nComponent.weightPerVertex</span><br />
10. Set nComponent Map Types to per vertex for all three maps<br />
11. In the Dynamic Constraint node, set the Strength to 1, the Glue Strength to 0.1 and Glue Strength Scale to 0.1. These values are just starting points to control the way the nCloth acts, but they give good results for the tests I have done.<br />
So, that is the setup done, you should have a network like this one:<br />
<br />
<a href="https://blogger.googleusercontent.com/img/b/R29vZ2xl/AVvXsEgrUrYF7kIz_SniRWIpA-yN2g5g3aXBv4iyge0gJFhBVy9gkj4VU-TBBJlZC12SKpB4O2AsvwLkkRfUFlmStYK2_l6ouYnII-MPH0jbhTKbwo9XcByd0_-oOTQ2RS1Qdqb7eaocMwllH3CY/s1600/SOuP_03.bmp"><img alt="" border="0" id="BLOGGER_PHOTO_ID_5660396592331998866" src="https://blogger.googleusercontent.com/img/b/R29vZ2xl/AVvXsEgrUrYF7kIz_SniRWIpA-yN2g5g3aXBv4iyge0gJFhBVy9gkj4VU-TBBJlZC12SKpB4O2AsvwLkkRfUFlmStYK2_l6ouYnII-MPH0jbhTKbwo9XcByd0_-oOTQ2RS1Qdqb7eaocMwllH3CY/s400/SOuP_03.bmp" style="cursor: hand; display: block; height: 245px; margin: 0px auto 10px; text-align: center; width: 400px;" /></a><br />
Please go to the <a href="http://www.soup-dev.com/index.html">SOuP website</a> and get the plugin. It's free, it's very powerful and there is loads of help, examples, tutorials. Also, the developer, Peter, seems to read all the forum posts and will reply to questions.<br />
I will attempt to post more walk-throughs for SOuP as I learn them and use them in a production.<br />
Here is a little shatter effect I created using SOuP ( and a couple of regular particle objects with instanced shard objects).<br />
<a href="https://blogger.googleusercontent.com/img/b/R29vZ2xl/AVvXsEhwPF0BQm03IxbncdblBlrFEihUnjImBHXiR4KtZnLHxfmeomqPKB7QoVFMWtunkcQvvq0OKcSBdlL53s9Lfy82fnykOE2ylleXnE6mNfira_hSAfWifVHS1BgskS2K7uKnD0CzvuU1abM0/s1600/bash_17.0025.jpg"><img alt="" border="0" id="BLOGGER_PHOTO_ID_5660402501643973330" src="https://blogger.googleusercontent.com/img/b/R29vZ2xl/AVvXsEhwPF0BQm03IxbncdblBlrFEihUnjImBHXiR4KtZnLHxfmeomqPKB7QoVFMWtunkcQvvq0OKcSBdlL53s9Lfy82fnykOE2ylleXnE6mNfira_hSAfWifVHS1BgskS2K7uKnD0CzvuU1abM0/s400/bash_17.0025.jpg" style="cursor: hand; cursor: pointer; display: block; height: 225px; margin: 0px auto 10px; text-align: center; width: 400px;" /></a>

Using multiple emFly compounds


When using Eric Mootz's excellent emFly system, it is possible to use multiple emFly compounds.

Let's say you have a complex flight plan and you want two different landing behavours, you will need to use a unique emFly compound for each landing.

Using ICE States, you can plug in a new emFly compound into each State's 'execute once enter' and 'execute every frame'.


I haven't seen this documented anywhere, but it worked for me in Softimage 2011.

Hey, my first Softimage ICE post !

nParticle cache creation - use forward slash

When you want to create a nParticle cache in a custom folder, say c:\particles,
enter that folder in the options box, but use the forward slash instead.


I'm not sure if this is a bug, but I found that using a backslash will not work.

Adding variation to per particle attributes that use ramps

Let's say you have a classic particle (not an nParticle) which will use a ramp to assign it's radiusPP.
You want to add some variation to the ramp but have each particle read a unique value and then travel up the ramp over it's lifespan as usual.

Here are the steps:

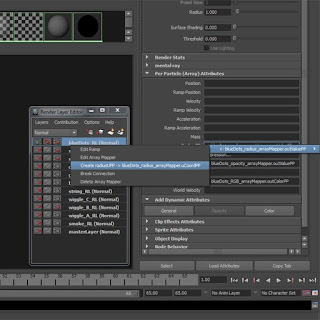
1. Create the radiusPP via the Add Dynamics Attibutes button
2. Create the ramp by right-clicking in the RadiusPP box
3. Right-click the RadiusPP box again and hold over the menu item until the second menu appears. Choose Create RadiusUPP


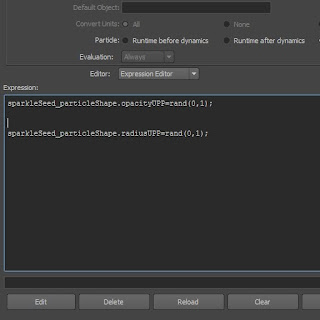
4. Once you have the RadiusUPP attribute, give it a random value betweek 0 and 1 via the expression editor


5. To link the UPP value to the ramp, we need to re-make the array mapper. Right-click on the RadiusPP box and delete the arrap mapper (you will want to rename or check the name of the ramp before you do this)

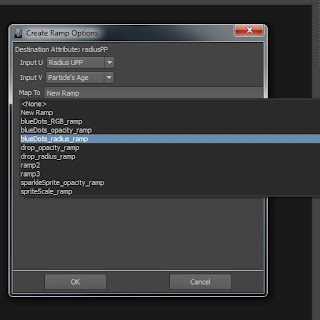
6. Right-click in the RadiusPP box again and click on the Create Ramp options box. Choose RadiusUPP for the input U, leave input V as Particle's Age and then choose the ramp in the Map To list.


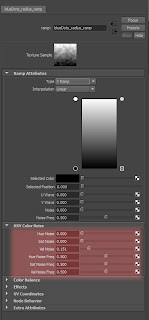
Now each particle is going to read a value at a random point across the bottom of the ramp and then move up the ramp over it's lifetime. Now we need to add some variation to the ramp. A quick way to do this is to use the ramp's built in noise functions

Approximating ConservePP

Wouldn't it be nice sometimes if we could have a per-particle Conserve attribute? Well, a reasonable approximation can be to use the mass attribute instead.

The conserve attribute essentially is a multiplier on the particle's velocity. For example, if a particle has velocity 100 at frame 1 and a conserve of 0.5, then a frame 2 the velocity would be 50, at frame 3 it would be 25, and so on.

So, the conserve attribute acts as a brake on the velocity.

In the physical world, mass (specifically Inertial mass) can be defined as 'resistance to acceleration'. When simulating particle dynamics we can use mass as a dampening effect on the motion of a particle, in a similar way that conserve does. The main difference is that we can define the mass on a per-particle basis: the higher the mass the higher the resistance to motion and the lower the 'conservePP' value we are creating.

Gravity versus Uniform field

In nature, a body is affected by gravity in relation to its mass. Newton's equation of gravity show this:

F= G (M * m) / r^2

Where M and m are the masses of the bodies affected.

Also, Newton's laws of motion (he was a clever guy) show that force is also proportional to mass:

F = m a

If we equate the two forces we see that both sides have the mass, m, which cancel each other out.

So, the acceleration that the body experiences is not proportional to its mass.

This is not true for a Universal force. The strength of a universal force is not linked to the mass of the body and so when we equate it with the law of motion we get something like this:

m a = U

Where U is the arbitrary universal force.

So the acceleration experienced by the body is now (inversely) proportional to its mass.

Maya copies nature in this regard, so if you want to use variable masses to drive your simulations, be aware that the Gravity force will affect all the particles uniformly but a Uniform field will affect them in (inverse) proportion to their mass.